Quick Answer: Every hammer swing costs stamina, the run ends when stamina empties, and what you smash out of the piggies funds three things: bills, the skill tree, and the shop. Pay bills on time — the notice warns "20%-50% will be deducted from earnings" — and each payment deals you a choose-one perk card. Learn the piggy types, because some restore stamina when smashed and effectively extend your run. Skip the gambling except for its three achievements. Bankruptcy is not a fail state; it's the prestige reset. This guide covers your first cycle, roughly the first two hours.
Version note: Written for the July 29, 2026 launch build, updated August 18 against Patch 1.1 (August 16), which added save slots, changed two late skill-tree prices and altered both gambling minigames. Assembled from the official patch notes, the Steam store page, official screenshots, developer forum replies and player reports, linked inline.
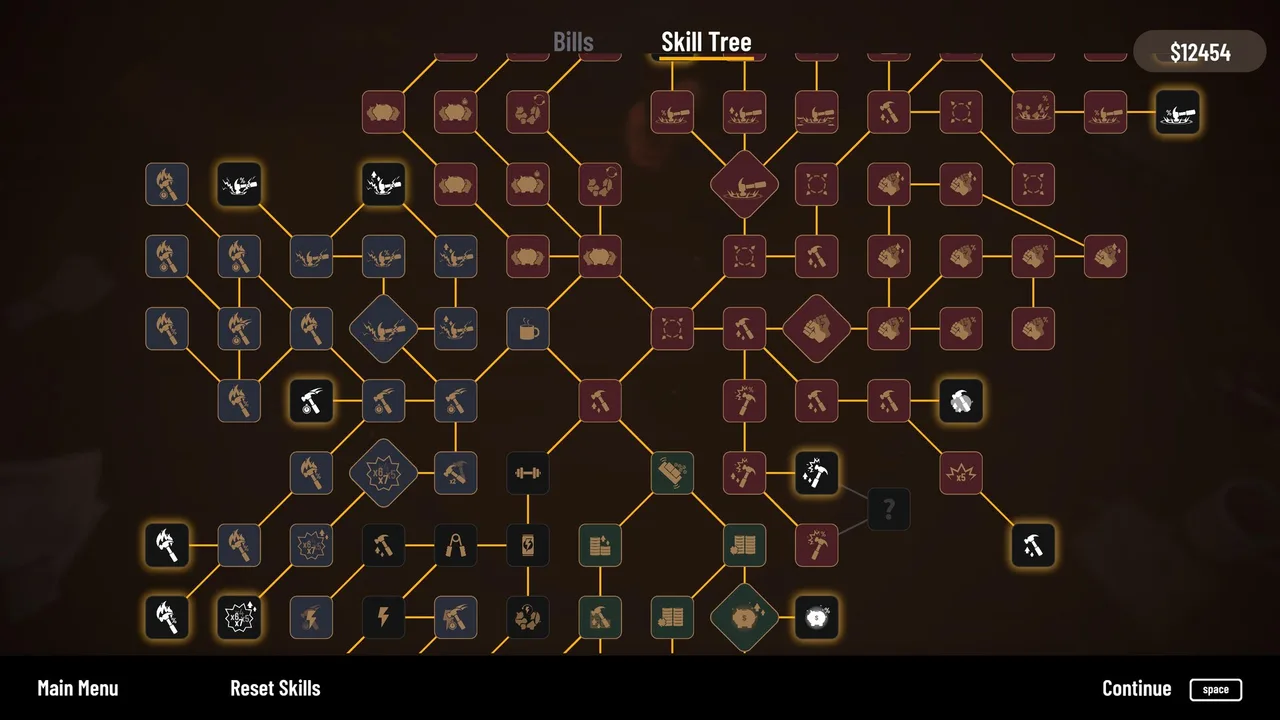 The skill tree is the biggest single system in the game — multiple branches, ability nodes, and a free-feeling Reset Skills button bottom-left. (Screenshot: Rike Games)
The Run: Stamina Is Your Timer
A run is one hammering session at the table. Watch two numbers.
Stamina sits top-left. Every swing spends it, and at zero the run ends and your haul is tallied. Caps grow over the arc — official screenshots show 130-140 mid-game. Anything that cuts swing cost, restores stamina or raises the cap is more money per run, so buy those first.
Accuracy is tracked per swing, and it is not cosmetic. Every 10 consecutive hits raises your combo by 1, and a single miss resets the combo to zero (developer-stated). Combo-scaling upgrades push that further — players cite a Combo Speed Plus node that wants a 350-hit chain. Swing deliberately instead of frantically. It also earns you two achievements: one clean run, then two in a row.
Earning milestones mark your curve. $100, $1,000 and $10,000 in a single run are all achievements, and they arrive on their own as upgrades stack.
Bills: Decide by the Due Date
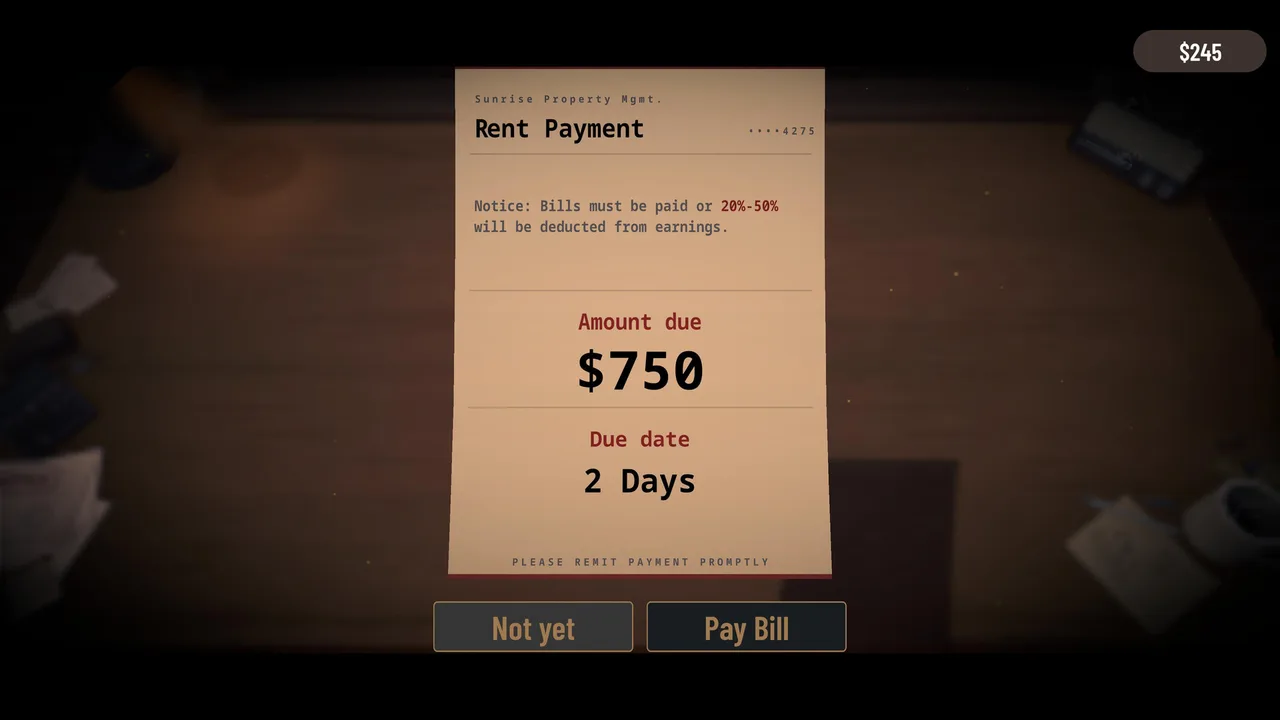 Every bill has an amount, a due date in days, and the same threat printed on it. (Screenshot: Rike Games)
Each bill carries a dollar amount and a due date counted in days. Miss it and 20%-50% gets deducted from your earnings, which compounds — reduced earnings make the next bill harder. Keep ignoring them and you go bankrupt; the store page says so outright.
Two facts drive every decision here. First, paying early does not buy you slack: paying a bill early moves the next bill's due date up by the same amount (three separate players confirmed this in early-August threads; one notes the demo worked the other way, and the developers haven't commented). Second, paying early does pay off once you own the right prestige rings. When a launch-day thread asked, the developer confirmed the hook: "There are upgrades in the prestige shop / rings you can get" tied to early payment. Players report the bonuses as extra attack speed plus an extra piggy on the table. One finisher's summary: "skipping early on for attack speed and +1 pig is actually huge, kinda falls off later because attack speed bonus has a cap."
So run these rules:
- No pay-early rings yet? Hold your money until the due date. Paying early gains you nothing and costs you flexibility.
- Rings bought, early or mid cycle? Pay the moment you can cover the bill. The attack speed and extra piggy compound into the next run.
- Rings bought, late cycle? Pay on schedule. The attack-speed bonus caps out, so the trick stops deciding anything.
- Two days out and short on cash? Keep running. Per-run income scales fast enough that one good run usually closes the gap.
- Due date here and still short? Both exits are taxed. Default and lose 20-50% of earnings, or borrow from Big Toni and let him skim. Pick the smaller bleed for your cycle, then get out of it fast.
Exact duration and stacking rules for the early-payment perks are still undocumented.
Big Toni's loan is a real mechanic with two achievements attached. Repay through the entry that sits alongside your bills in the bill menu — it's easy to miss. While you're in debt he skims your earnings, and none of that skim counts toward repayment (single community source). It's pure tax, so repay in full as soon as a good run allows.
Two experienced players independently describe a different use for him, and it is the better one. Toni always lends roughly enough to cover your next bill, no more — so he is not a way to front-load upgrades, he is a way to squeeze one extra bill out of a dying run. Since prestige points come only from money spent on bills, that last Toni-funded payment converts straight into permanent progress. One player's summary: "I never even got close to paying Tony off during my playthrough, I just used his money to get one or two more bills out of it."
Decision rule: when you cannot make the deadline, spend everything you have on upgrades first, then borrow from Toni to pay the bill, then go bankrupt. You bank the upgrades and the legacy points instead of neither.
Every paid bill deals you a perk card, choose one of three. Examples from the official screenshots: Deep Freeze (chance on hit to freeze all piggies for 2.5s, chance builds per swing), Recovery Smash (+1 stamina per smash), Interest Rate (earn 5% of your savings as bonus coins each run). Perks compound across the cycle. Take stamina and income scaling over one-off effects.
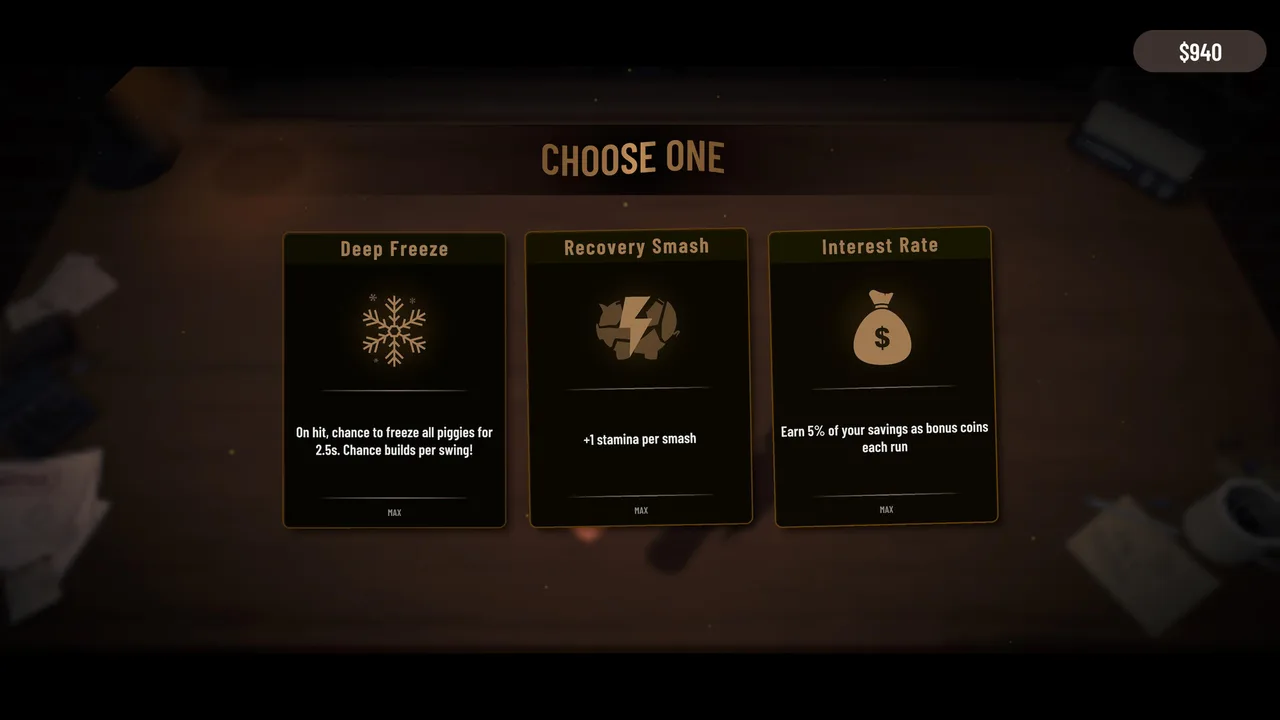 Every paid bill is also a build choice. (Screenshot: Rike Games)
The Skill Tree: Where the Money Goes
The tree is large. The store page names the directions: grip strength, caffeine, gym, wrist, luck, plus ability nodes like rock rain and an electrified hammer.
Expect the first hour to feel small. One critical launch review calls individual upgrades minor ("you gain a 10% chance to get 5% back when paying a bill") and says the exponential take-off comes later, once perks, better hammers and the prestige layer stack on top.
A rough community priority has now settled: damage first, then reward, then stamina, and skip attack speed. Two players in a stuck-player thread argue it independently, one calling attack speed "a trap" and the other pointing at why — bonks per run are a limited resource, so swinging faster spends that budget quicker rather than earning more from it. Accuracy also matters more than it looks, because a missed swing costs the same budget as a landed one. Nobody has posted node math behind this, so treat it as experienced-player consensus rather than measured.
One buying habit from the same thread that is cheap to adopt: upgrades cluster into price tiers, and within a tier the cheapest one is usually the best value. The clearest example a player gives is the +2 piggy node, which ranges from $600 in one tier to $40M in another for a comparable effect. Scan the whole tier before you commit.
Two late nodes got more expensive in Patch 1.1, and the developers say the old prices were the bug: Second Wind's boost went from $3.75M to $6M and Last Stand damage from $13M to $35M, because an earlier node had been cheaper than a later one. Any route planning you read that predates August 16 is costed wrong at the top of the tree.
Also new in 1.1: the tree remembers your pan and zoom between visits instead of resetting, and Q/E switches tabs in the upgrade menu.
Use the Reset Skills button freely while you work out your own preference; a wrong turn isn't permanent.
The Loop Underneath: Piggies Versus Swings
One framing from an experienced player explains more than any single upgrade list, and it is worth internalising before you spend anything:
"This game is just about balancing how many piggies you have vs how fast you are breaking them. If you find yourself running out of piggies, get more upgrades that spawn them. If you are not running out of them buy more stuff that breaks them."
Read your own runs against that. Standing idle waiting for spawns means you overbought damage; ending the run with a full table means you overbought spawns. It is the cheapest diagnostic in the game and it needs no numbers.
The same player supplies the fact that reframes Big Toni: you only earn prestige points on money you spend on bills. That makes Toni's loan a points source rather than an investment tool — see below.
Piggies: Not All Banks Are Equal
New piggy types unlock as you progress and they behave differently. Per the store page: "Some run away, some are too lazy to move, and others carry all the black money you never had."
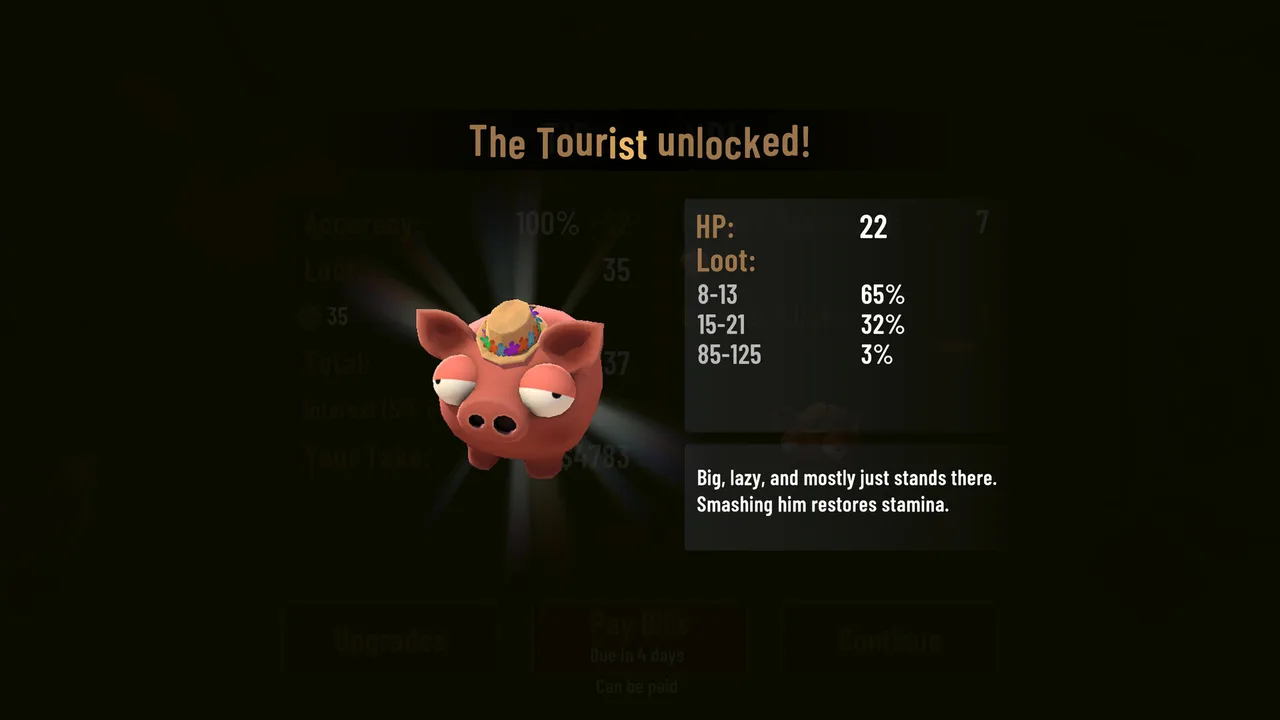 Each new piggy type comes with a stat card — the Tourist has 22 HP, tiered loot odds (65% for 8-13, 3% for 85-125), and restores stamina when smashed. (Screenshot: Rike Games)
Prioritise piggies that restore stamina on kill, like the Tourist above. They extend the run, which is free money. The developer notes the restore amount is small, deliberately not shown as a number, and was rebalanced for the full release.
Check the two collection tabs as you go. The Piggies tab levels up discovered types (Level 1-4 in official screenshots), and the Collection tab tracks the rare coins that drop mid-run. Both feed achievements.
Watch for Goblig, a robber who steals your money. He can be hammered like anything else on the table — "He didn't survive," per the player who met him (single launch-day report; the developers had teased a scheming-piggy addition for the full version).
One piggy genuinely cannot be broken, and it is not a bug. Players who keep swinging at the bomb piggies without ever destroying one are running into designed behaviour, per the community answer: every piggy can be destroyed except the bombs, which absorb a set amount of damage and then stop taking damage at all until they detonate. Once a bomb has soaked its quota, further swings on it are wasted stamina — move to another target and let it go off.
The Shop: Hammers and the $10M Ceiling
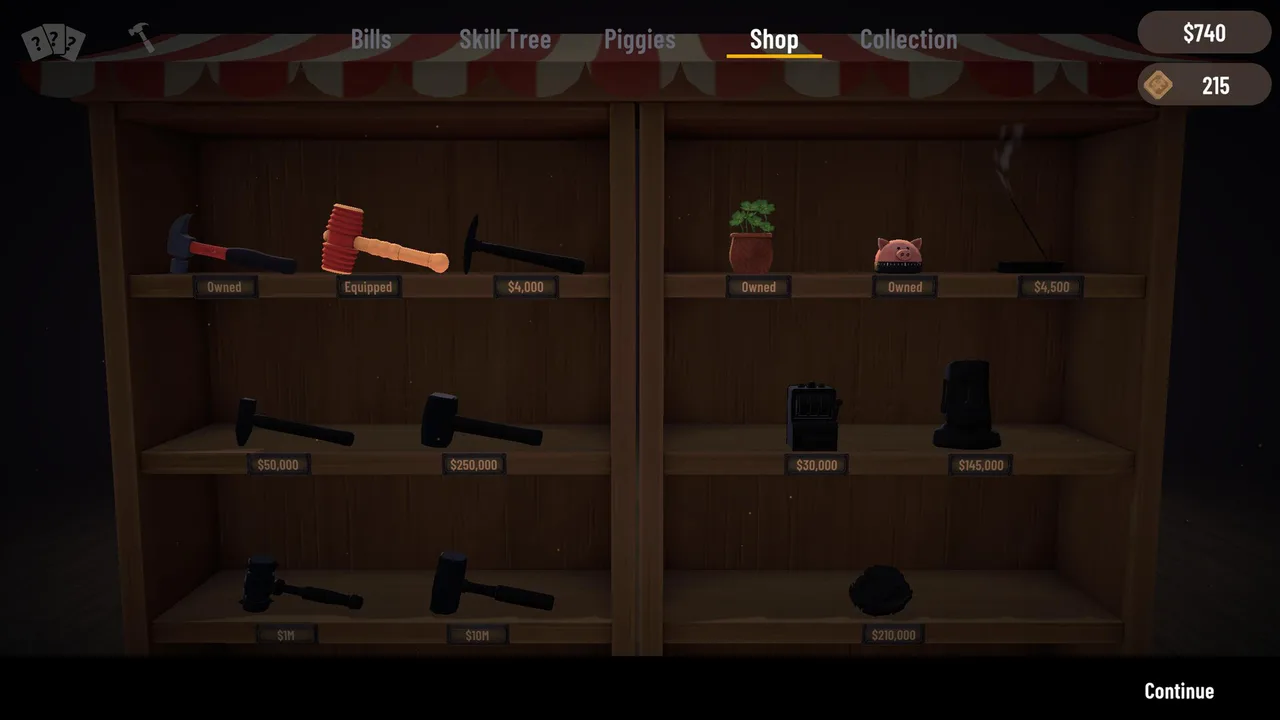 The hammer ladder — $4,000, $50,000, $250,000, $1M, $10M — plus décor items up to $210,000. Buying everything is an achievement. (Screenshot: Rike Games)
Hammers are not straight upgrades. Per the developers they trade off: higher crit with a smaller radius, or fast swings with a big radius and less damage per hit. Pick by how you play. Precision play wants the crit hammer; crowd play wants the radius, which also feeds the Multismasher achievement.
The full shelf, décor included, tops out at the $10,000,000 hammer. That purchase is the Bought It All achievement and lands late in the arc by design.
The Gambling Corner: Mostly Skippable
The desk holds coinflip, all-in bets, Double or Nothing, and Piggy Shuffle (track the piggy through a shuffle; a win doubles your stake).
The community read is consistent: entertaining, not efficient. Skip the gambling unless it's Double or Nothing and you can clear the full payout in one round, per one completionist; another reviewer found the coinflip and shuffle underwhelming.
Three things to know before you feel cheated. The developers state flatly in Patch 1.1's notes that the flip "is NOT rigged" — it is a real 50/50 physics simulation, and making it feel fairer is impossible by design. What they added instead is control: right-click (R1 on controller) before a Double or Nothing toss to turn the coin and choose which side it starts on. And the "100% luck next run" perk card does not apply to coin flips — Patch 1.1 rewrote Lucky Loss in-game to say so directly, because Luck only affects piggy loot quality.
Piggy Shuffle changed in the same patch, and not in your favour. Players had learned to read which piggy held the money from its idle wobble before the shuffle began; the developers removed that tell deliberately, on the grounds that it made the minigame "really unfunny to play" once you knew it. Since the cups move faster than most people can track by eye, treat Piggy Shuffle as a coin toss with worse odds and bet small.
The slot machine is not a mini-game you play. Once purchased it sits on the desk and runs itself, generating passive income with no interaction. If yours seems to do nothing, it's working.
Visit each mini-game once anyway: three achievements live here. Do them early, while your stake is pocket change. Full state of the odds debate: Bugs & Fixes.
When the Bills Win
They eventually will, and that's the design. Bankruptcy converts your bill-paying record into Prestige Points for permanent upgrades. When to pull the trigger and what to buy: Bankruptcy & Prestige Guide.